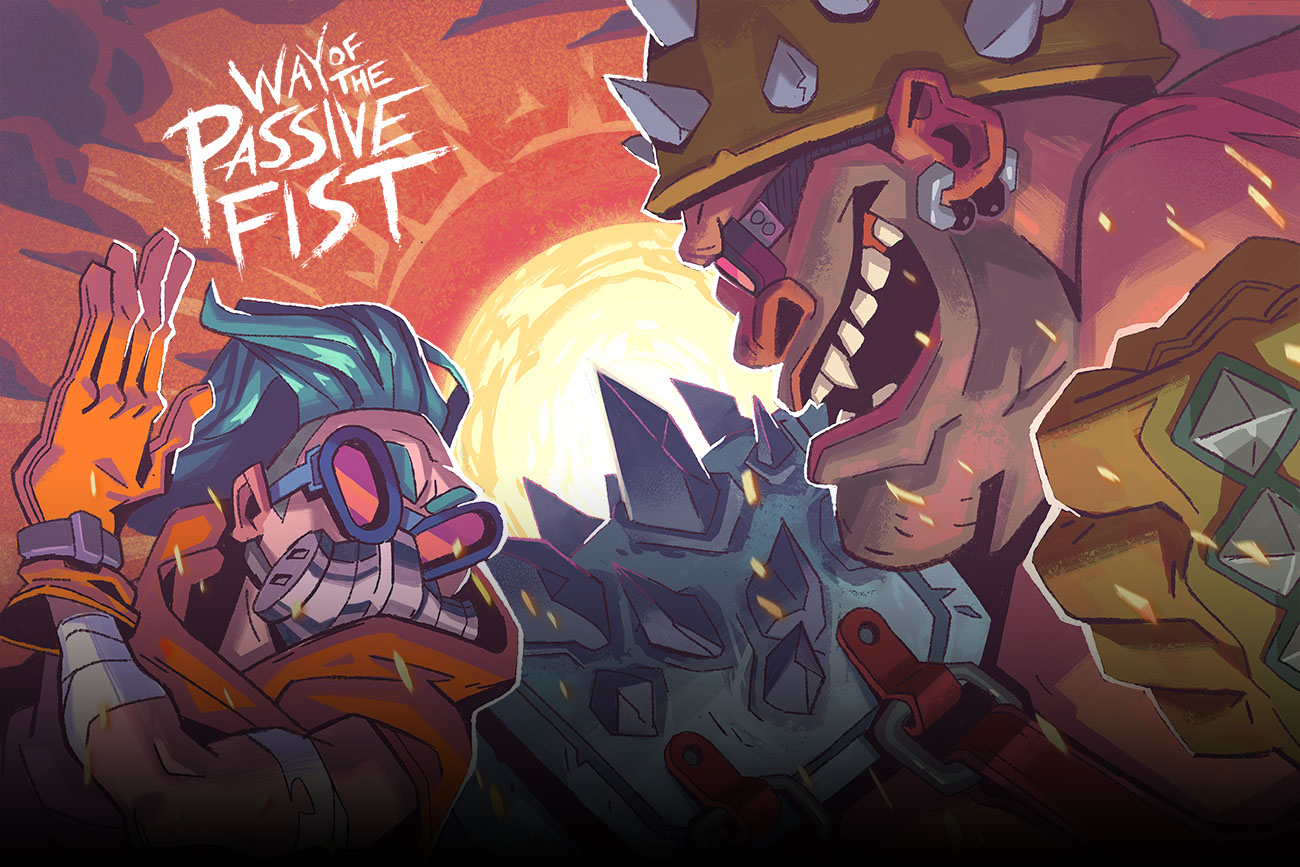

The Way
Instruction Manual for Way of the Passive Fist
Contents
Story
Controls
Video Settings
Audio Settings
Story Mode
New Dawn Modes
Game Screen
Difficulty Setting
Tips & Hints
Contact / Support
Progression
Scene Scores
The Parry
Planet Zircon V.
A distant, desolate world home to a long forgotten colony.
Dissenters had warned that the planet was too close to its star to support life, they were right. Eager explorers who rushed to capitalize on the planet's rich resources are now left stranded on a harsh, unforgiving world struggling to survive.
Enter the Wanderer.
A legend of the wastes, the Wanderer has learned to survive by mastering the Art of the Passive Fist.
With patience and a steady hand, the Wanderer can endure any attack and outlast any foe.
Emerging from isolation, the Wanderer heads into a nearby settlement to confront raiders wreaking havoc in the wastes...
Note: All controls can be modified from the Options Menu.
Remapped controls affect gameplay only (does not affect menu navigation).
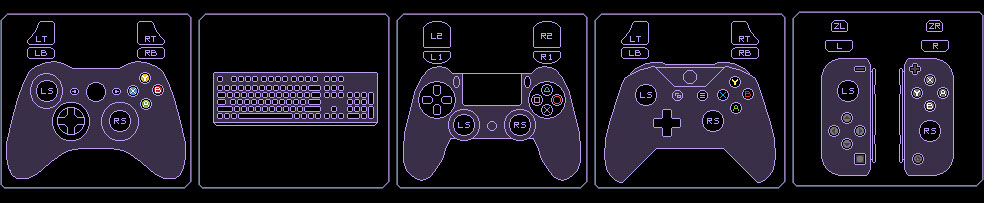
Parry
X
J
Square
X
Y
Dodge
B
L
Circle
B
A
Check / Shove
Y
K
Triangle
Y
X
Dash
A
Spacebar
Cross
A
B
Super
RT
I
R2
RT
ZR
Movement
Left Stick
WASD
Left Stick
Left Stick
Left Stick
Your primary, and most common, action in the game is the parry. It is used to deflect incoming attacks and reduce the attacker's stamina.
PARRYING
When you press the parry button, The Wanderer will throw their arm out in a blocking motion, during this entire animation (up until the arm is fully extended) you are safe from attacks, but you are vulnerable during the recovery. You must be facing towards the enemy to parry their attack. If the enemy performs multiple attacks you will have to parry each one.
PARRY RECOVERY
Once a parry is completed, there is a recovery period where The Wanderer returns to a standing position. You can't perform another parry during this period and you are vulnerable, so mashing the parry button will only make you more vulnerable to attacks. If a parry successfully 'connects' this recovery is skipped and you instantly regain control.
PERFECT PARRY TIMING
If the enemy's attack hits your parry during the first few frames, this will be a perfect parry. Waiting until the last possible split second to parry is the key to nailing the perfect timing.
LATE PARRY TIMING
When you are hit with an attack you have a very small timing window to press the parry button and perform a Late Parry. If you reaction is quick enough you will do a parry and flash red. When this happens, you will only take half the damage you would have taken.
COLOR FLASHING
The Wanderer will flash when parries connect. A Red flash indicates a Late Parry. A White Flash indicates a Perfect Parry. A Blue flash indicates a normal parry.
WHIFFING
Any action that does not successfully connect is called a whiff. If you whiff an action (Parry, Check, Dodge) you will lose your combo, reset your score multiplier to X1 and lose your Super Meter.
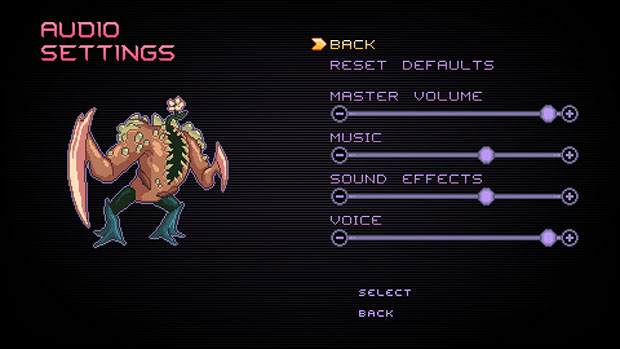
MASTER VOLUME
Sets the overall volume of all sound channels.
MUSIC
Sets the volume level of just the music tracks.
SOUND EFFECTS
Sets the volume of all sound effects, including enemy grunts and attack tells.
VOICE
Sets the volume of the voice channel for spoken lines of dialogue.
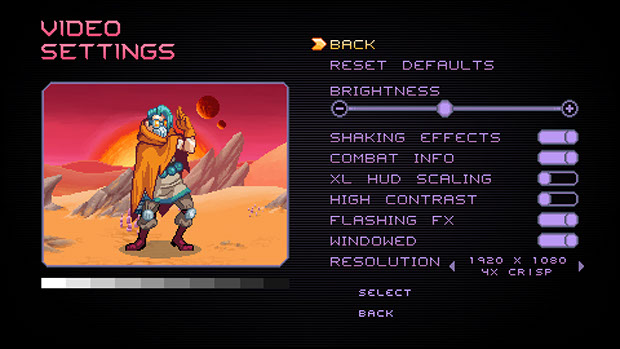
WINDOWED ( STEAM ONLY )
Toggles between windowed mode or fullscreen mode.
RESOLUTION ( STEAM ONLY )
Sets the resolution scaling of the game. "Crisp" factors will be visually sharpest. "Fill" factors will look softer, and fit non-16:9 resolutions.
BRIGHTNESS
Sets the overall screen brightness for the whole game.
SHAKING EFFECTS
Determines whether or not screen shake effects will happen during gameplay.
COMBAT INFO
Toggles display of the Scene Bar HUD and the Score Bar HUD.
XL HUD SCALING
Toggles between the default sized HUD or extra large HUD for better readability.
HIGH CONTRAST
Turns on a visual filter that makes characters and other important gameplay elements (checkpoints, health pickups, etc.) stand out from background elements.
FLASHING FX
Determines whether or not full screen flashing effects will happen during gameplay.
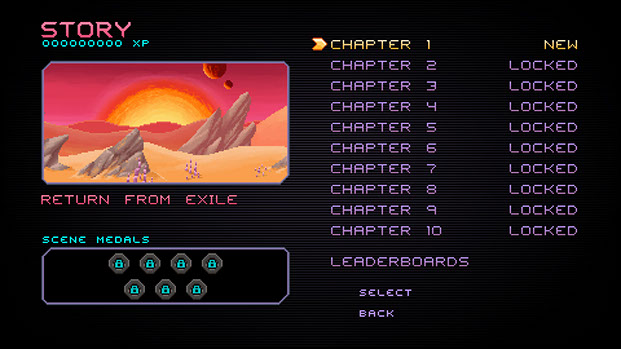
The first gameplay mode available at the start of the game, Story Mode lets you play through the game's chapters, in order.
XP
The total of the XP earned is shown in the top-left corner. It is the sum of your best scene scores across the entire game. If you want to increase your total XP, you'll have to improve your rank in scenes (turn bronze medal scores into silver or gold medal scores).
SCENE MEDALS
Your best medal results from each scene are recorded (bronze, silver, gold). This lets you track which chapters you'll need to improve on.
LEADERBOARDS
This lets you view the leaderboards and compare your total XP level with other players.
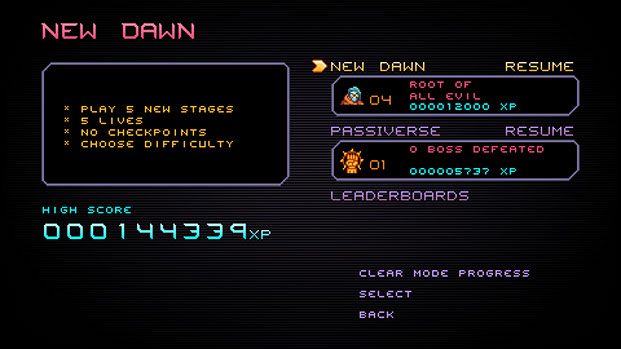
LEADERBOARDS
This lets you view the leaderboards and compare your High Score level with other players (New Dawn & Passiverse have separate leaderboards).
New Dawn Modes present new gameplay for players that want to experience a more challenging version of the game. There are no checkpoints and you have limited lives. When all of your lives are gone, it's game over!
You can leave these modes during stages, and can resume at the start of a stage later, but you will keep your current life count & health level until you are game over or restart a run.
If you Game Over during playthrough, you will have to clear the progress manually to start a new run.
NEW DAWN
The events of New Dawn take place after the events of the Story. New Dawn is an epilogue storyline spanning 5 new stages. The emphasis is on fast paced combat against tougher enemy groups and challenging boss rematches.
PASSIVERSE
The Passiverse is a rogue-lite mode that provides a different experience with each playthrough. The player will be given the choice of which battles to take on (a selection of 3 are shown to the player at a time) and will have to survive many battles and 5 boss fights on a single life bar to survive.
You can choose harder routes that lead straight to bosses or take the longer, easier route and test your stamina. Only ultimate parry masters will survive the Passiverse!
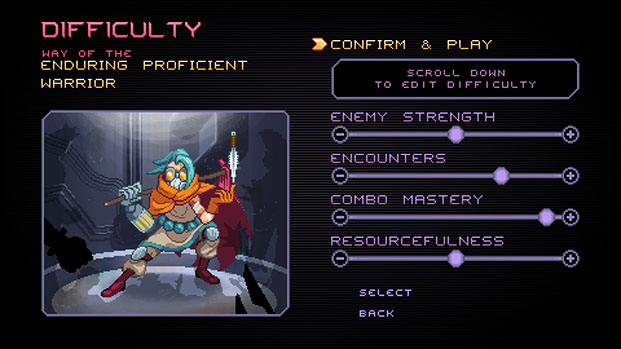
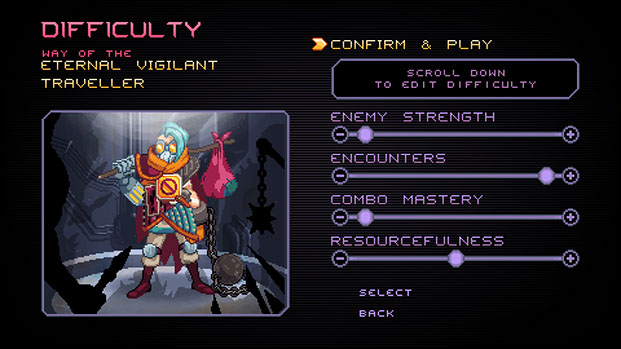
The Difficulty Setting screen lets you set four difficulty parameters to customize a difficulty setting that suits your preferred play style. You can also practice by focusing on specific elements to help you improve in the game.
ENEMY STRENGTH
This setting determines how much damage enemies do when they successfully hit you.
Lowest Setting: Enemies will do the least amount of damage when they hit you.
Highest Setting: Enemies will do as much as 4 times the damage as compared to the lowest setting.
ENCOUNTERS
This setting determines how many enemies you will be fighting at once.
Lowest Setting: enemy waves will be made up of fewer enemies, meaning you'll rarely fight more than a couple of enemies at a time.
Highest Setting: enemy waves will be made up of many enemies, meaning you'll have to face more enemies on screen at once.
COMBO MASTERY
This setting determines which parries will award combo points.
Lowest Setting: Late parries, Normal Parries & Perfect Parries all award combo points.
Medium Setting: Late parries do NOT award combo points. Normal Parries and Perfect Parries award combo points.
Highest Setting: ONLY perfect parries will award combo points.
RESOURCEFULNESS
This setting determines how many checkpoints and items will be found in levels.
Lowest Setting: there will be a checkpoint for every Scene (combat encounter) and many healing items will be found when caches are opened.
Highest Setting: you will have to fight through as many as 3 Scenes between checkpoints and caches will yield fewer healing items.
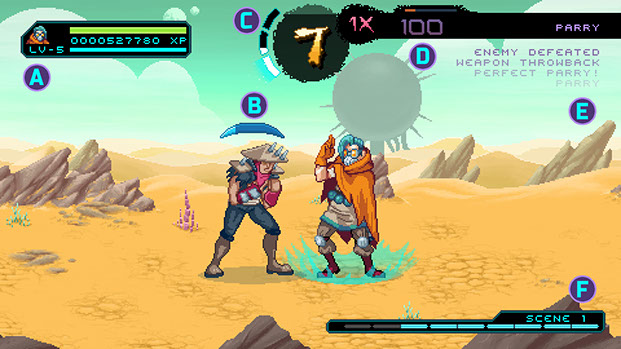
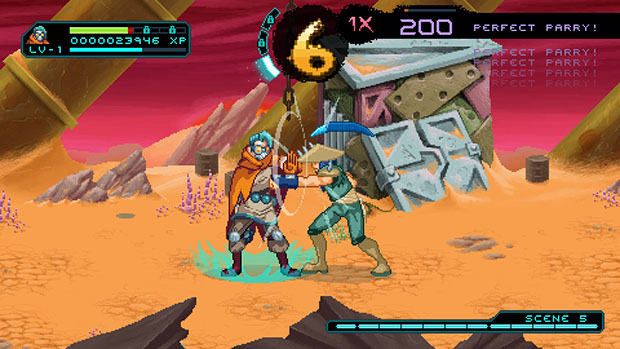
[A] HUD
This is where player status information is displayed. This includes the player's health (green bar), the player's XP (overall score and blue bar), and remaining lives (next to the head icon -- appears only in Arcade Modes). Below the head icon is player's current skill level.
[B] Enemy Stamina
The stamina of the enemy, displays over enemy's head. When the enemy runs out of stamina, they enter a tired state, and can be defeated.
[C] Combo Meter
Displays current combo count (number) and combo meter. The combo meter fills as the combo builds, as each bar segment is filled a new Super Move is available.
[D] Score Bar
Information on moment to moment combat is displayed here. The score from the most recent event is shown here along with the multiplier being applied to it. The base value is always shown, so if you score a parry (100) with a 4x multiplier you will actually get 400 points.
Above the score is the medal bar, it shows how close you are to achieving medal rankings in the current fight. It fills with bronze, then fills with silver, and finally shows gold.
[E] Move List
Shows the most recent score event, as well as the previous score events.
[F] Scene Bar
The Scene Bar shows how many enemies remain in the current Scene. It also shows the make up of the waves in the current Scene. This is useful for planning your strategies (do you use a Power Punch on this enemy, or wait for the next wave?).
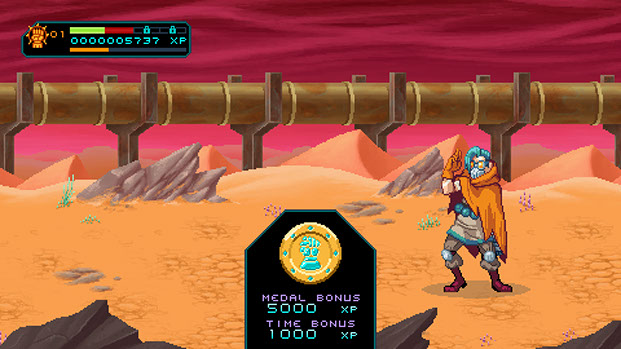
At the end of every Scene you are awarded XP based on your performance. This XP is how you will level up to unlock new abilities and your total XP will affect your rank on the Leaderboards.
MEDAL BONUS
Based on which medal you earn you will be awarded a base XP value. A Bronze Medal is worth 1000 XP, Silver worth 2500 XP and Gold worth 5000 XP.
TIME BONUS
Each Scene has a unique time bonus that is earned based on how quickly the Scene is completed.
TOTAL
This is the total XP that is earned from the Scene. It is the sum of the Medal Bonus and the Time Bonus. If you are replaying a Scene, you must earn a higher total XP than any previous attempt to earn the difference. If you earn less XP than previously, then you will get no new XP.
As you earn XP you will level up and unlock new abilities and upgrades. You begin the game (starting Story Mode or a new Arcade Mode run) at Level 0.
LEVEL 1 - DASH
With the dash you can move around more quickly and evade enemies more easily. Also, this will allow you to more freely adjust the flow of battle by switching your focus from one enemy to another. Dashing through a tired enemy will knock them down.
LEVEL 2 - HEALTH +
The first upgrade segment of your health bar will be unlocking, providing a bonus to maximum health.
LEVEL 3 - SUPER SLAM
This will unlock the second segment of the Combo Meter allowing you access to a new the Super Slam. The Super Slam does more damage than the Power Punch. It releases a shockwave that does minor damage to all enemies and knocks them down, and can defeat lesser enemies instantly.

LEVEL 4 - HEALTH ++
The final upgrade segment of your health bar will be unlocked, providing another bonus to maximum health.
LEVEL 5 - GRAVITY WELL
The Ultimate Super Move. Gravity Well draws in all enemies and defeats them all at once with one powerful burst of energy! This Super will defeat all currently active enemies (pay attention to the Scene Bar!) and also awards the highest point value. When used with a high multiplier, this is the best way to earn points towards Gold Medals.
Progression in Passiverse
Unlike progression in Story Mode, when playing Passiverse, you must find Orbs to unlock your new abilities, so you won't necessarily get them in order. If you first find the Gravity Well Orb, then the first ability you'll unlock is Gravity Well. Each playtrough of Passiverse randomizes the Orbs so you will have a different progression each time you play.
Enemies you can set your watch to
Each enemy in the game has specific attacks with specific rhythms. An enemy will be consistent throughout the game, so learn their timing!
Don't mash!
Button mashing won't help you succeed. Only timed, intentional button presses will see you emerge as a victor.
Gold and Gone!
Once you've scored enough points to earn a gold medal, concentrate on finishing the fight quickly to max out your time bonus.
Watch the Wanderer
The Wanderer will let you know when your Super Move is ready. Keep an eye out for the power effects emitting from the Wanderer.
Don't neglect the Check
Your shoulder check ability can be used to push enemies around, but it also lets you take control of the fight and create your own opportunities (see Time your Power Punches).
Level Up and replay
If you have trouble earning Gold Medals in early chapters, you can return to them (in Story Mode) once you've earned stronger abilities (like Gravity Well) and dominate!
Don't anticipate... REACT!
Don't parry if you think an attack is coming! Wait until you see the windup or hear the tell. Don't risk a whiff and a lost combo!
In a hurry? Dash em down!
You can dash through a tired enemy to defeat them, this is quicker than the shove but you'll miss out on the Final Touch point bonus.
Min-Max your way to Gold!
Getting Gold Medals is more than just not getting hit. Build multipliers, maximize your parries and land Supers at just the right moment.
Time your Power Punches
You are vulnerable when throwing a Power Punch. A quick enemy can hit you during the wind up, so use it wisely. An enemy dashing towards you is just asking to be punched!
Tweak the Difficulty
Don't be afraid to experiment with the difficulty settings and find something that works for you.
You always have a chance!
With effective Parries and Dodges, you can always win a fight, even when you're down to the smallest sliver of health. Never give up!
Most importantly, Have fun!


Copyright © Household Games Inc.